Better SEO with GWT

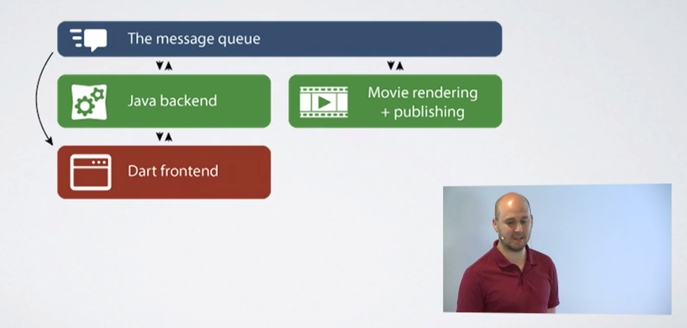
When we started working on our new website, we quickly faced challenges often encountered with single-page application frameworks: enabling search engine optimization (SEO) and crawlability. The problem with these kinds of applications is that you only have one .html host file, which has two important consequences:

  1. Having only one title tag makes it hard for people to use the browser history for navigation
  2. It becomes impossible to define meta properties with relevant data for different site sections

Thankfully, each of these problems can be solved.¨

Changing the title

This is actually a simple fix. We can use GWT’s Document class to change the title when our section is attached to the DOM:


public class MyViewImpl implements MyView, AttachEvent.Handler {
interface Binder extends UiBinder<Widget, MyViewImpl> {}
private final Widget widget;
@Inject
MyViewImpl(Binder binder) {
widget = binder.createAndBindUi(this);
widget.addAttachHandler(this);
}
@Override
public void onAttachOrDetach(AttachEvent event) {
if (event.isAttached()) {
Document.get().setTitle("This is the new title of the page");
}
}
// …
}

view raw

MyViewImpl.java

hosted with ❤ by GitHub

Adding and updating meta properties

Crawler

The hard way

We could create MetaElements and inject them into the head section manually when our section is attached to the DOM :


public class MyViewImpl implements MyView, AttachEvent.Handler {
interface Binder extends UiBinder<Widget, MyViewImpl> {}
private final Widget widget;
@Inject
MyViewImpl(Binder binder) {
widget = binder.createAndBindUi(this);
widget.addAttachHandler(this);
}
@Override
public void onAttachOrDetach(AttachEvent event) {
if (event.isAttached()) {
Document.get().setTitle("This is the new title of the page");
updateMetaTags();
}
}
private void updateMetaTags() {
injectMetaProperty("description", "This is the description");
injectMetaProperty("og:image", "http://placehold.it/350×150&quot;);
// …
}
private void injectMetaProperty(String property, String value) {
Document document = Document.get();
MetaElement metaElement = document.createMetaElement();
metaElement.setName(property);
metaElement.setContent(value);
document.getHead().insertFirst(metaElement);
}
// …
}

view raw

MyViewImpl.java

hosted with ❤ by GitHub

Using GWT-SEO

This seems a bit cumbersome and isn’t quite what webmasters are used to, so perhaps we can do better. This is where GWT-SEO comes into play. It allows us to define meta properties in the UiBinder’s ui.xml file as a Widget, almost like we would define them in an html file. The library will then create and inject the defined meta elements in the head section when your View is attached to the DOM, removing the need to register your own AttachHandler.


<!DOCTYPE ui:UiBinder SYSTEM "http://dl.google.com/gwt/DTD/xhtml.ent"&gt;
<ui:UiBinder xmlns:ui="urn:ui:com.google.gwt.uibinder"
xmlns:g="urn:import:com.google.gwt.user.client.ui"
xmlns:seo="urn:import:com.arcbees.seo.widget">
<g:HTMLPanel>
<seo:SeoWidget>
<seo:Title>My Title</seo:Title>
<seo:Description>My Description</seo:Description>
<seo:Keywords>kw1,kw2,kw3</seo:Keywords>
<seo:Og>
<seo:OgImage height="480" width="480">http://some.image.png</seo:OgImage&gt;
<seo:OgType typeValue="WEBSITE"/>
</seo:Og>
<seo:Custom property="og:audio">http://example.com/bond/theme.mp3</seo:Custom&gt;
<seo:FbAppId>1234567</seo:FbAppId>
</seo:SeoWidget>
<p>This is my page, now with SEO!</p>
</g:HTMLPanel>
</ui:UiBinder>

Now that’s better! Notice that the title is also handled, which means no more document.setTitle() is needed either!

Internationalization (i18n)

Moreover, since we’re within a UiBinder, we can therefore take advantage of the power of ui:msg to internationalize our properties (more details on using GWT i18n with UiBinder in an upcoming post!). In the meantime, you can take a look at our website for a live example of GWT-SEO using i18n, and especially at the sources of the website to see more in details how it was done, or at the source of my bee page for a specific example.


<seo:SeoWidget>
<seo:Title>
<ui:msg description="SEO – MAIN – TITLE">Title</ui:msg>
</seo:Title>
<seo:Description>
<ui:msg description="SEO – MAIN – DESCRIPTION">Description</ui:msg>
</seo:Description>
<!– Some more tags –>
</seo:SeoWidget>

Dynamic data

More often than not, when implementing a single-page application, the content of the section will depend on some data fetched from an AJAX request (e.g. : a product page in an online store). GWT-SEO can also help you with that, although it requires some Java code in your request’s callback. Let’s say we have a Presenter that retrieves a Product when the product’s dynamic page is loaded, and passes it to its View through the setProduct method.


import com.arcbees.seo.Image;
import com.arcbees.seo.OpenGraph;
import com.arcbees.seo.SeoElements;
import com.arcbees.seo.TagsInjector;
// Other imports…
public class MyViewImpl implements MyView, AttachEvent.Handler {
interface Binder extends UiBinder<Widget, MyViewImpl> {}
private final Widget widget;
private final TagsInjector tagsInjector;
@Inject
MyViewImpl(
Binder binder.
TagsInjector tagsInjector) {
widget = binder.createAndBindUi(this);
this.tagsInjector = tagsInjector;
}
@Override
public void setProduct(Product product) {
Photo photo = product.getPhoto();
Image image = new Image(photo.getUrl(), photo.getHeight(), photo.getWidth(), photo.getMimeType());
OpenGraph openGraph = new OpenGraph.Builder()
.withImage(image)
.build();
SeoElements seoElements = new SeoElements.Builder()
.withTitle(product.getName())
.withDescription(product.getDescription())
.withOpenGraph(openGraph)
.build();
tagsInjector.inject(seoElements);
}
// …
}

view raw

MyViewImpl.java

hosted with ❤ by GitHub

The advantage of using GWT-SEO, versus manually creating MetaElements to inject dynamic properties, is that it prevents duplicates by replacing existing properties with new ones, by leveraging the injection of derived tags (title and og:title, description and og:description, etc.).

But what good would all that do if crawlers like Google or Facebook can’t retrieve the fully rendered version of the page?

Making the application crawlable

Making your application crawlable could be the topic of a whole other blogpost, but I will discuss it briefly here.

Most crawlers nowadays implement a simple directive that allows us to serve different content when a hashbang (#!) is encountered in an URL. So the first step is to make sure your section URLs contain hashbangs. For example, a crawler fetching http://www.arcbees.com/#!/support would replace the hashbang with the escaped_fragment query parameter, in this case : http://www.arcbees.com/?_escaped_fragment_=/support (take a look at the rendered DOM).

Rendering for crawlers

Now that we have a way to identify crawlers’ requests, we need to serve a rendered version when we detect the _escaped_fragment_ query parameter to ensure the crawler doesn’t need to run any JavaScript code to access the content. To achieve this, we need something like HtmlUnit or PhantomJS to retrieve our webpage and process the JavaScript until we have a fully rendered page. Or better yet, use GWTP Crawler Service, which handles everything for us, from detecting crawlers’ requests to generating a fully rendered page!

Conclusion

Writing the meta properties for all the sections of your single-page application will allow you to be better ranked on search engines, and give you a chance to stand out against your competitors. It will also make your pages easier to share across social medias, which is, in this 2.0 era, mandatory for any web page. SEO and crawlability are easy things to overlook when developing your application, but to ignore them is to miss out on a substantial number of potential visitors!

Maxime Mériouma-Caron

Dart Developer Summit Highlights – Day 2

Hi again Dartisans. Here’s the second post I promised you. For those of you who haven’t seen the first post, I made a summary of the Dart Developer Summit 2015.

Keynote: Ads

Ferhat Buyukkokten and Ted Sander highlight how Google’s Ads team uses Dart to build their web applications. This is a good demonstration of how Dart can interoperate with other existing systems. It’s also a nice confirmation that Google is dedicated to Dart for its new projects.

  • Updating a CRM system
    • Change the back-end in flight
  • Before Dart, there was frustration
    • Changes were slow and hard to implement
  • They really didn’t want to try languages without types at Google
  • Fast, even as JS
    • Dart is just as fast as handwritten js for several benchmarks
    • Sometimes faster and sometimes slower, but not by a lot
  • Batteries included
    • Great tooling
    • Package manager
  • Internal/External libraries were easy to use
  • dart-mockito is their mocking library – it just works
  • Large-scale applications with good performances
    • observatory helped diagnosing where the pain points were
    • low and stable memory usage
  • Communicate through different apps using a JavaScript event bus
    • AdWords is built with multiple apps – GWT, Dart, etc. and they talk to each other
  • Divide and conquer
    • Even if you could start of scratch, it’s still a good idea to keep your application in modules
  • Google Ads are committed to Dartcommitment

Instill.io

Mathieu Lorber and François Saulnier from Instill.io explain how they managed to build their video creation web application with Dart as their front-end technology. Yet another good example of how Dart can be used with other technologies (in this case Java) for the back-end. They also explain in details how they transitioned from Angular.Dart to Polymer during their development. It’s interesting to see how they did it, because I personally did the opposite (moving from Polymer to Angular).

  • Why Dart?
    • All about productivity. They had a debate on whether they should start with technologies they know, after a long discussion they agreed that Dart presented all the advantages of the technologies they knew, and they decided to start with Dart.
  • Architecture
    • Dart front-end
    • Java back-end
      • CQRS + event-sourcing
    • Movie rendering layer
    • Publishing layer
    • Message queuearchitecture
  • The Java back-end can be painful when coming back from Dart
  • They use Angular.Dart for their application framework
    • It was hard in Angular.Dart 1.0 to create small isolated components
    • It was hard to programmatically add a component
  • They now use Polymer for their components instead of Angular
    • They can now reuse small components
    • They now use Polymer elements as DOM elements in their Angular application
    • Angular controllers are now stateful Polymer components
    • Routing is now a Polymer component too
  • What they miss from Angular.Dart
    • Injection and services
      • Dependency injection can be reused independently. They created an @Inject() annotation
    • The Scope
      • Communication between components
      • Internal change tracking
        • Polymer data-binding
      • Communication between non-related components
    • Routing
      • They didn’t really miss it, they introduced a notion of Places. However you can still use Angular.dart routing package independently.

Building Production Dart Apps with an Open Source Workflow

Devon Carew and Luke Church built DartPad, an IDE for Dart in the browser, as open source and with open source. In this session, they show you how to unit test, measure code coverage, trigger Continuous Integration, and deploy to the cloud, all with open-source tools and libraries. The most interesting part about the tools they presented here, is how they leverage the power of Google Cloud Platform with AppEngine, the Managed VMs and the Memcache.

  • How they built DartPad
  • Continuous integration for unit tests
    • Travis CI
    • Drone.io
    • AppVeyor (windows)
  • Functional Testing
    • Sauce Labs
    • test/web_integration.dart with WebDriver
  • Code coverage
    • Package dart_coveralls and coveralls service
      • Get notifications on specific threshold
  • Web hosting and scaling
    • They use AppEngine
    • UI Server serves static files & redirect
    • dart-services in AppEngine
  • Dart on AppEngine
    • The Dart app deployed on AppEngine routes to a Dart process in a Managed VM
    • The process in the ManagedVM uses the rpc package
    • Making it fast
      • Memcache
      • Keeping the VM warm
        • Reusing Dart VM
        • Uptime monitoring
  • Hosted metrics
    • Librato – hosted metrics and logging service
  • Uptime monitoring
    • Pingdom – update reports services
  • DartPad is now 1.0!

Panel with Dart Engineers

I decided not to put all questions and answers because some of them were a bit too specific, but here are my favorite ones, which I think will be of interest to more people.

  • Q: How does type annotation impact performances?
  • A: On the VM specifically, it doesn’t matter at all whether you type your variables or not. When the code is parsed (unless in checked mode), we throw the types away. The optimizations are based on collected types that you see at runtime, and it works well; they know exactly what are the potential subclasses that can be used.
  • Q: Is there any plans on doing code hot-swapping in Dart?
  • A: It would probably work well already in the VM, but there are plans to find good solutions to that in the following months.
  • Q: DartEditor vs Webstorm?
  • A: We’re moving away from DartEditor, and going with WebStorm. The other goal is to provide a good UX to people who are already familiar with other tools via plugins (Eclipse, Sublime, etc). For the “try-dart” experience that DartEditor was giving, we suggest going with DartPad now, where you can try things with low friction, share snippets and make things run. WebStorm is the primary focus.
  • Q: What’s the roadmap with Polymer.Dart?
  • A: We’re waiting for the Polymer team to stabilize. It’s coming pretty soon. When they reach Polymer 1.0, we’re going to provide Polymer.Dart 1.0. Second thing is with dev_compiler and jsinterop, you will be able to share your components/libraries with other developers (dart/js).
  • Q: What will happen if Fletch gets out of experimental?
  • A: We will ship it this year.
  • Q: Dart vs ES6? Does ES6 provide all what Dart does?
  • A: Dart still has an advantage. ES6 is still JavaScript, and you don’t fix all problems by adding classes. The types in Dart still make programs easier to read and easier to maintain.

Google Fiber and Dart

Jason Daly shows how they created the UI of Google Fiber with Dart, and how it integrates with other languages in their infrastructure. With all the other alternatives to Dart, he also explains why they still picked it, and what they got out of it. It’s a good example of how Dart can be used on embedded devices, not without good challenges.

  • How they created the UI with HTML5/CSS3 and Dart
  • They have Dart-VM-based services interacting with native code
  • Their new solution
    • They wanted to move lots of data on the cloud instead of on the boxes in households
  • Why Dart?
    • Looks and feels like many other languages
      • Classes, generics, strict type checking (when you want it), libraries and imports
    • Still has the dynamic and asynchronous features that web apps need
    • Not limited to browser and web apps
    • Development wins
      • Easier to pick up than JavaScript
      • Dartium makes prototyping easy
      • Allows on-the fly rendering of UI tweaks
  • Deployment wins
    • Deploy to a url for the UI
    • Server-side can be updated without deploying a new firmware image
  • Challenges
    • No pointing device (no mouse) — had to develop their own widgets
    • Limited physical resources
    • Dynamic fetching
    • Interfacing with the hardware
  • The browser cannot do everything
    • Interactions with the disk
  • DVR Service
    • Runs in the Dart VM on the Google Fiber Storage Box
    • Interacts with the TV UI running in Chromium on the TV Box
  • Dart works well on embedded hardware

Dart for the Internet of Things

Dennis Khvostionov of DGLogik shows their new IoT platform called DSA, and how they implemented it end-to-end with Dart. We can see their WYSIWYG IoC application editor (DGLux) built on top of their Open Source platform (DSA).

  • DGLogik
  • DGLux – Drag and drop WYSIWYG Visual Application Development
    • > 200k Dart LOC
    • > 1k deployments globally
  • Why Dart
    • Rapid developement
    • Rapid testing
    • Rapid fixing
  • dart2js has never been problem for them
  • DSA – Open Source Platform & Toolkit for IoT
  • A bunch of demos, should watch them.
  • He shows us a game called “performanceTest” that allows us to see the whole thing in action, it runs pretty smoothly!

Moving from Node.js to Dart

Faisal Abid tells how he ported the API of his native Android stock simulator game Market Wolf from Node.js to Dart. Since Node.js is so popular, many people probably asked themselves whether Dart or Node.js would be the best choice. Here Faisal explains why he went to Dart, and what’s been beneficial for him since then.

  • Why?
    • Tooling & debugging support for node.js is a pain
    • Node.js didn’t seem to be the right answer
    • Node and Dart are pretty similar
  • Differences
    • Different paradigm
    • Multiple cores
    • Node – multiple VMs needed
    • Dart – Isolates
  • Pros and cons to moving to Dart
    • Pros
      • Better profiling and debugging with Observatory
      • Syntax and language features
      • Organization of code is better and enforced
      • Support for major databases on pub.dartlang.org
    • Pro/Con
      • Shift in thinking
    • Con
      • Missing support for esoteric and very new database. But most protocols are JSON based, so it’s easy to port it
  • Finding alternatives to what he was using in Node.js
    • Express
      • Redstone
        • Actively developed by community
        • Very express-y
        • Good support for plugins/middlewares
      • Shelf
        • Written by Google
        • The base for Redstone
        • Minimal
        • Use middleware for routing
        • Redstone’s middlewares come from Shelf
        • Simple API
      • RPC
        • The newest
        • Enables you to write RPC style Dart API’s easily
        • Self documenting API
        • Uses annotations
        • Bit more verbose
        • Very clear API
        • Can generate client side libraries in Java, Python and others
    • Socket.io
      • Dart comes natively with WebSockets
  • Thinking in Dart
    • It’s easy to replicate Node.js, but you must think in Dart
    • Simplify architecture by using Isolates
  • Isolates are very low on memory footprint
    • He used to have 3 node.js VMs + 1 message broker, now he has 3 isolates @ 1.5MB of memory each
  • Deployment
    • Anything that supports Docker supports Dart
    • Codeship + AWS Beanstalk
  • Worth it?
    • Yes. No question about it
    • Dart language, language features, observatory, etc.
  • Missing anything from Node.js?
    • Absolutely not.
  • Amount of lines of code shrunk dramatically. Easier to debug, deploy, less dependencies to worry about.

moving from node

Dart for Mobile

Kasper Lund presents a demo of Fletch, an experimental runtime for Dart that makes it possible to implement highly concurrent programs in the Dart programming language. He shows how it can make native applications run on Android and iOS.

Post_DART_Conf_v2-06

  • Why do people want to use Dart on mobile?
    • Modern and light stack
    • Developer productivity
    • Code sharing across multiple client apps
      • Use same model but different UIs
  • Fletch — Dart runtime for mobile
    • Still early stage
    • Small and elegant runtime system
    • Supports on-the-fly program changes
    • Runs on iOS through interpretation
    • Light
      • Extremely fast startup (~2ms)
      • Low memory overhead (~200K binary size)
    • Interactive
      • Atomic program changes over wire protocol
    • Concurrent
      • Blocking an isolate is simple and cheap
      • Easily scales to 100k concurrent isolates
  • Fletch SDK
    • Command line
    • Breakpoints
    • Live code editing in your editor and apply changes with the command line
  • Roadmap
    • Q3 – Fletch SDK Beta
    • Q4 – Fletch SDK 1.0
    • Q4 – Dart for mobile 1.0
      • Will contain the toolkit for Presentation, Services and Runtime
  • Interop
    • Intermediate language declaring services in low level
    • Implement them in Dart
    • Fast messaging
      • Messages are transferred as binary
      • No expensive encoding/decoding
  • It’s not the fastest thing ever as it’s interpreting code, but it’s most of the time way enough for real things.

Sky: An Experiment Writing for Android with Dart

Eric Seidel presents Sky. Sky is an experimental, high-performance UI framework for mobile apps. Sky helps you create apps with beautiful user interfaces and high-quality interactive design that run smoothly at 120 Hz. This presentation contains multiple demos, and gives us a little sneak peek of the a functional programming style inspired by React that Sky uses. It will be fun to see how in the future Sky and Fletch will interact (if they will).

Post_DART_Conf_v2-01

  • Sky Demo on Google Play
  • Android app all written with Dart (even the UI) Native
  • Best mobile experience
  • Looking for performance
    • 120Hz or bust
  • Platform agnostic
    • Android, iOS and more
  • Full Access
    • Fully priviledged applications
  • Fast development
    • Edit, Refresh, Profit
  • Continuous deployment, it’s always up-to-date
  • Rich & flexible layout & painting
  • Still early stage
  • Hello world live coding demo
  • Sky Framework
    • Written in Dart
    • Big bag of widgets (Material Design)
    • Entirely non-blocking API
    • Functional reactive style (Stateless components)
    • Opinionated part of Sky that knows on what kind of device the application is running on
    • Integrated tools
      • Chrome tracing
      • Observatory in the device (can connect remotely)

Joel Trottier-Hebert

New release: GWT-Chosen 2.1

GWT-Chosen is used by an increasing number of people through the GWT community and we’re proud to deliver this new release. Several enhancements had been made, but the two major ones are the addition of a new option that let you position the dropdown on top or below the text box and, to make sure that we continue to deliver to our users a product that can evolve quickly without regression problems, we added a lot of integration tests using Selenium.

Screen Shot 2015-05-04 at 2.43.29 PM

The full list of closed issues can be found here and an example of the new dropdownPosition option can be found under List of options in our documentation.

Have fun with this new release!

Dart Developer Summit Highlights – Day 1

Update: The highlights of the day 2 are out!

Hello Dartisans, I’ve had the chance to watch the Dart Summit live streams and I’ve been a good student. For all of you who don’t have time, or are just interested to remember what was said, I’ve taken notes during all the presentations.

Disclaimer: These are my personal notes, to the best of my comprehension. If you find anything wrong with them please let me know and I’ll update this post. Also, if you feel I missed some important information, let me know, I’ll update this.

So I’ve structured the highlights by talk, stating what I found the most interesting or thought was the most important. I’ve noted most of the information as bullet points.

This first post only contains notes about the first day of the summit. A second will come in the next days, with all my notes for Day 2.

For all of you who want to watch the whole talks, there’s now a Youtube Playlist available. Enjoy!

Keynote: Dart Today & Tomorrow

Dart co-founders Lars Bak and Kasper Lund who are Software Engineers at Google, tell us what’s coming in the next year for Dart and its ecosystem. I like how they’ve put emphasis on how Dart is there to stay for a long time, and how Google uses it.

  • IDE
    • WebStorm is now the new IDE of choice for Dart development.
  • Mobile
    • They showed 3 native mobile apps having a dart model and different UIs. (iOS and Android and also a dart console app.)
    • Fletch: A Dart runtime for iOS
      • Only adds ~200K to the size of your native app
      • Supports on-the-fly program changes
    • Parallel programming
      • People like the idea of isolates, but don’t like to use isolates
        • Features like Parallel.run() should come
      • Research directions
        • Synchronous operations
        • Zero-copy message passing
        • Lightweight isolates
    • Dart LTS
      • Google is already relying on Dart for many projects including: Google Ads, Google Fiber, Google Express, Google’s internal CRM app.
      • They are committed to building their next-gen web apps with Dart
      • Dart is for the long run.
      • lts
    • Web Frameworks
      • Angular 2.0 will be the preferred web application framework for Dart
        • Smaller generated Javascript output
        • Faster execution (x3 faster than 1.0)
  • SDK Roadmap
    • May 2015 : Migration to GitHub
    • 1.11 – Retire DartEditor, and put in front WebStorm as IDE (and plugins)
    • 1.12 – Http2 + Google RPC
    • Q3 – Fletch (beta)
    • Q4 – Fletch (final)
    • Q4 – Dart Mobile Services
    • 2.0 – Dart Dev Compiler
  • roadmap
  • Breaking Changes
    • Future SDK version should all be backward compatible. If a breaking change is introduced, they will provide a migration tool to migrate your code.

Async in Dart

Florian Loitsch, Software Engineer at Google presents Dart’s asynchronous features. He makes a very good introduction to async/await and its derivatives for Iterables. He also presents the package stack_trace to get more useful information from stack traces for asynchronous code.

  • Async/Await now work out of the box
    • Also works with dart2js web applications
  • async types
  • Stack traces are noisy and contain not-so-useful information for the normal Dart developer
    • The package stack_trace makes it easier to get relevant information in stacktraces with async-await

Space-Frugal Reflection

Erik Ernst, Software Engineer at Google shows how using traditional reflection might not always be a good choice, especially for Web applications in Dart. He then brings on the table a solution to the problem of increasing code size: the new package Reflectable.

  • Traditionnal reflection in Dart is expensive
    •  For dart2js web applications, code size explodes because of tree-shaking
  • dart:mirrors
    • Compiler-integrated
    • Uses nice, compact reprensation
    • Control size with MirrorsUsed(…) annotation
    • Includes more code, not compositional
    • In practice, it is difficult to tune, large output
  • Reflectable
    • New package for reflection
    • Essentially the same interface
    • Without the size explosion
    • Still early stage
  • Traditional vs Reflectable
    • Traditionnal: mapping between original names and generated ones
    • Reflectable: write more code, but the generated code will be replaced with static code

Dart at 60FPS

Ross Smith and Arturs Vitols of Willowbrite tell us their story of how they made a mobile game with Dart. They present us what their biggest challenges were, and how they succeeded. I couldn’t resist buying the game to try it. Ends up being pretty fun! Get it here. I was also very impressed by their home made editor.

  • Challenges
    • run on old devices
    • < 20mb
    • performances
    • unique look & feel
  • How they did it
    • Vector images –> ask device to process instead of using disk space.
    • Midi sound –> ask device to process instead of using disk space.
    • Short refresh cycles with webgl.
  • They made an editor – very impressive.

Debugging and Profiling Dart Programs with Observatory

John McCutchan and Todd Turnidge, Software Engineers at Google give us an overview of the Observatory in Dart. This is probably my biggest surprise of the day. I didn’t know much about the Observatory, but wow, I’m surprised at how advanced it is, and at how much it can do. I’ve taken a lot of notes here, you really should watch the whole demo.

  • Hosted by the VM
    • Providing suite of program inspection and analysis tools.
  • New link in JS console
  • View class code
    • View code coverage
    • Find live instances of specific classes
    • Invoke/edit live code (classes/instances (add methods to instances/changes values))
  • Allocation profile
    • Per class allocation statistics
    • Per heap space garbage collection statistics
    • User controllable accumulator
  • CPU profile
    • Find spots in code that use a lot of CPU
  • Debugger
    • Command line debugger
      • Provides live debugging in observatory
    • Tab completion (functions, scripts)
    • Lets spy on variables (visually)
    • Lets you edit variable content
  • Multiuser
    • Multiple users can connect to the same observatory, just share the URL
  • Always available –> Runs on its own, and always collects
    • Easier to diagnose problems that happened in the past.
  • Profiler now understands functions inlining
  • Now provides metrics/graphs
  • Roadmap
    • Improved debugger
    • Timeline of important events
    • Allocation call sites (where do I allocate class Foo)
    • Display source code as live, hyperlinked view
  • Available wherever the VM is available.
    • Server/Command-line
    • Sky applications
    • Web applications in Dartium

Dart for the Web: State of the Union

Dan Grove and Kevin Moore, Software Engineers at Google tell us what the current state of Dart is, and in which direction the Dart team will go for the next year. This was probably the talk I wanted to watch the most because of the recent changes related to the Dart team’s objectives (with the VM not going in Chrome). There were great announcements during this talk.

Post_DART_Conf_v1-2

  • Embrace the web instead of replace the web
  • Things have changed in the web (ES6)
  • Javascript everywhere
  • Changed the focus from integrating the VM in Chrome to embrace JS and target all other browsers
    • Development & deployment/production were too divergent
  • Dev compiler vs Production compiler
    • Dev compiler should contain settings for development/deployment to keep a fast refresh cycle for dev.
  • Dev Compiler
    • Its aims to include the following:
      • A static checker based on stricter-than-standard-Dart type rules.
      • A modular Dart-to-ES6 transpiler for Dart programs that statically check.
      • Under 1 second compile
      • Would produce small, readable, clean, efficient JS code.
  • Export your Dart library in JavaScript (SYODLAJ: Ship your own Dart Library as JavaScript)
    • Someone shouldn’t notice you’ve written your lib in Dart
  • They still want to ship Dartium for now, but are working in parallel on getting Dart Dev Compiler out.
  • Test package will be the future of testing in Dart
    • The test package uses stack_trace out of the box
    • Supports multiple platforms (vm, browsers, chrome, safari, dartium, content_shell, phantom-js)
  • Frameworks
    • Angular2 is now in Dev preview (It is still marked as alpha-21, but Angular Team consider it as Dev Preview) (website is now angular.io)
    • Should wait for Polymer to be stabilized
  • Webstorm IntelliJ is now the “De-facto” IDE.
  • Coming soon
Angular 2.0 is now in Developer Preview

Angular 2.0 is now in Developer Preview

Getting the Most Out of dart2js

Stephen Adams, Software Engineer at Google shows us how static analysis and type inference work in dart2js. He also gives tips to help dart2js producing smaller, faster JavaScript code. This should be watched by anyone who is confused (or are not sure) about how the type system works in Dart.

  • How dart2js currently works
    • Compile dart types to JS primitives where possible.
    • In checked mode, the types will be checked at runtime. Checked mode works like assertions on types. It asserts “is this a String or null” (for a String annotated variable)
    • In production mode, those assertions are turned off.
  • This talks explains how dart2js works in technical details (how type inference works for example)
  • Things to do in production, but are OK to use for testing
    • Avoid dart:mirrors, use code generation instead (e.g: smoke, reflectable, polymer)
    • Avoid noSuchMethod, otherwise it will produce slower and bigger Javascript (adding more two-level dispatch/more indirections)
      • If you use dart2js -v … you will see what those classes implementing noSuchMethod are.
    • Avoid o.runtimeType -> defeats type erasure optimization
  • What’s coming next?
    • Looking at ways to improve type analysis
    • Looking at ways to make better use of inferred types
    • Looking into making two level dispatch cheaper

Switching to Dart

John Ryan of Workiva explains how they switched to Dart in an existing big scale application. He presents us why they switched, what they got out of it and how they did it. This should convince people who think that Dart doesn’t scale well or that it doesn’t blend well with other technologies.

  • They switched from ActionScript
  • They tell their experience of porting an existing application to Dart
  • After switching
    • Faster ramp up time
    • Better dev experience
    • Less focus on tools
    • Code easier to share
  • Why they switched
    • Build large scale apps
    • JavaScript tools are difficult to compose
    • Dart is a complete solution
  • The old application
    • over 1 million lines of code
    • 2-8 mins to compile
  • How they switched
    • React components –> React Dart
    • Unit tests –> Jasmine Tests –> Guinness –> unittest
    • Convert the existing Javascript into a working application, and then write idiomatic Dart
  • The Dart VM
    • Debugging is fast, predictable
    • Switching branches is cheaper (with pub)
  • Checked code
  • REPL in Dartium
  • Continuous integration
    • Their docker file for it
      • Should be modified a bit for the new test package, but it has useful things, like a script to install content_shell
    • WebDriver for functional testing
      • WebDriver.dart – Looks pretty good with async/await
    • Tests are written in Dart

Migrating Trustwave’s Large Customer Portal to Dart

Eric Woerner, Director of Software Architecture at Trustwave tell us their story of migrating their customer portal to Dart. We learned what they discovered, what frameworks they use, and how they leverage the power of each of them. I was surprised at how they integrated Dart to an existing Flex application.

  • They tell their history of migrating Trustwave Portal to Dart (Flex to Dart)
  • They serialize data to and from existing Java back-end services
  • What they discovered
    • Increased productivity
    • RPC style calls with Dart
    • Application development with Angular and components in Polymer
      Dart and Flex interop
  • What they now use
    • Application framework: Angular Dart
      • Deferred loading
      • Routing
      • Views
    • UI Components: Polymer
    • What’s next?
      • Angular 2.0
      • Polymer 1.0

Joel Trottier-Hebert

Managing your CSS (GSS) files with variables and a theme

My previous article showed you how to use CSS inside your GWT application. Today, we will introduce the concept of variables, and show you how to manage them effectively using theme files.

Variables

Post_GSS_Howto2_v1-03-white

One of the best examples of variable use in CSS is probably color management. If your application has a default blue color, let’s say #2054e8, and it is used in multiple places, you will need to remember this particular color code every time you specify that color. Then if you decide to make your default color the lovely #f31ae5 shade of pink, you will need to do a find and replace across your whole project, and hope that everything went well.

All these hassles can be avoided if you use variables for your colors, so let’s do that!

Creating the Colors file

We will create Colors.java in src/main/java/com/company/project/client/resources.

package com.company.project.client.resources;

public class Colors {
    /* -> App colors -- */
    public static final String C_PRIMARY = "#2054e8";
    public static final String C_SECONDARY = "#bea885";
    /* -> Default colors -- */
    public static final String C_BACKGROUND = "#f0efef";
    public static final String C_TEXT = "#323232";
    public static final String C_TEXT_LIGHT = "#a1a1a1";
}

We will discuss variable naming conventions later. Right now, you only need to understand that we can define a variable, like C_PRIMARY, and assign it a value, such as our initial shade of blue #2054e8.

The main purpose of this file is to contain all color values in the same place. It will then be easy to replace them later, and create different themes for our app.

Creating the associated GSS file

This is where we start to feel the real power of GSS over regular CSS files. After compilation, GSS files output basic CSS, transforming variables into the values associated with them.

In order to easily use our variables, we need to define them in a file. We will name that file colors.gss and put it into src/main/resources/com/company/project/client/resources/css.

@provide 'colors';

@def C_PRIMARY        eval("com.company.project.client.resources.Colors.C_PRIMARY");
@def C_SECONDARY      eval("com.company.project.client.resources.Colors.C_SECONDARY");
@def C_BACKGROUND     eval("com.company.project.client.resources.Colors.C_BACKGROUND");
@def C_TEXT           eval("com.company.project.client.resources.Colors.C_TEXT");
@def C_TEXT_LIGHT     eval("com.company.project.client.resources.Colors.C_TEXT_LIGHT");

We define variable names, and point them to the associated variables inside Colors.java.

The most important part is the very first line:

@provide 'colors';

We are providing this file with a name that we will be able to import later on, making the variables defined in this file accessible in other contexts.

Binding it with your default resources style file

Before we can use this file, we need to supply it to our style’s resource file. My default style file is named style.gss and it uses the AppResources.java resource file, located in src/main/java/com/company/project/client/resources.

You can probably guess what you’ll find in this file:

package com.company.project.client.resources;

import com.google.gwt.resources.client.ClientBundle;
import com.google.gwt.resources.client.CssResource;

public interface AppResources extends ClientBundle {
    interface Style extends CssResource {
        // Your classes here
    }

    @Source("css/style.gss")
    Style style();
}

We can see that we are using style() with the file located at css/style.gss. We need to add the color.gss to @Source, so it’s accessible. Instead of a string, we need to pass an array of strings, pointing to the desired files.

    @Source({"css/colors.gss", "css/style.gss"})
    Style style();
}

Note that we need to declare colors.gss before style.gss. Otherwise, style.gss will try to load the colors.gss file, but it will not yet be defined, causing an error.

Using variables inside of the style file

Remember when we defined @provide 'colors'? It is now required inside style.gss. Once that’s done, you will have access to your variables!

@require "colors";

body {
    background-color: C_BACKGROUND;
    color: C_TEXT;
    font-size: 1.5rem;
}

Structure

You can define variables for a lot of things beside colors, like sizes and fonts. You could decide to create a variables.gss file and add all your variables there, but this can pose a problem as your application grows. I prefer to structure my files by what they do, giving each set of variables their own file:

// src/main/java/com/company/project/client/resources/variables
    -> Colors.java
    -> Fonts.java
    -> Sizes.java

// src/main/resources/com/company/project/client/resources/variables
    -> colors.gss
    -> fonts.gss
    -> sizes.gss

This way, if you only need to use Colors inside of a specific style sheet, you can import them alone. Variable types become more modular.

Naming Conventions

As variables are not prefixed with any symbols, it helps to write them in uppercase. That way it’s easy to spot them in your CSS.

I also like to prefix them with a single letter that represents the type of variable that it is.

- Colors.java   -> C_VARIABLE_NAME (C_PRIMARY, C_BACKGROUND, C_TEXT ...)
- Fonts.java    -> F_VARIABLE_NAME (F_PRIMARY, F_SECONDARY_BOLD ...)
- Sizes.java    -> S_VARIABLE_NAME (S_SECTION_PADDING, S_LINE_HEIGHT ...)

Give your variables meaningful names, something that you will be able to remember and understand upon reading. Describe the purpose of the variable, not its value.

For example, F_PRIMARY is the primary font used inside the app, the most common one that will be almost everywhere. I find the use of primary / secondary easy to remember. It has a strong meaning, and it’s about what the variable is used for, and not about the value held by the variable. A bad example would be F_ARIAL for the same variable with the same purpose. It’s bad because if, in the middle of the project, you decide to change the main font from Arial to Helvetica, you will need to refactor the name of your variable. This is what we are trying to avoid.

Instead of C_RED for an error message color, go for C_ERROR. Or even better : C_STATE_ERROR. You will be able to manage your state colors easily, like C_STATE_SUCCESS and C_STATE_DEFAULT without worrying about the color it is.

Theme

Post_GSS_Howto2_v1-04-white

The problem

If you create different variable files, you gain the ability to only load the ones you want. This is both good and bad. If you need several variable types, you have to specify each one of them inside of your resource loader, and then require them in your GSS file. This can quickly become annoying, and it makes your code harder to maintain.

// src/main/java/com/company/project/client/resources/AppResources.java

package com.company.project.client.resources;

import com.google.gwt.resources.client.ClientBundle;
import com.google.gwt.resources.client.CssResource;

public interface AppResources extends ClientBundle {
    interface Style extends CssResource {
        // Your classes here
    }

    @Source({"css/variables/colors.gss",
             "css/variables/fonts.gss",
             "css/variables/sizes.gss",
             "css/style.gss"})
    Style style();
}
/* src/main/resources/com/company/project/client/resources/css/style.gss */

@require "colors";
@require "fonts";
@require "sizes";

body {
    background-color: C_BACKGROUND;
    color: C_TEXT;
    font-family: F_PRIMARY;
    line-height: S_LINE_HEIGHT;
}

As you can see, if you have multiple GSS files, you need to include required variables inside each of those files. And if you need to add another variable set, or remove one, you will need to go inside each of your Resource and GSS files and adapt them accordingly. And that sucks.

The solution

Faced with the above problem, you might think going back to having just one Variables.java file and a variables.gss file is not a bad idea after all. But we can have our cake and eat it too. We can keep the separation in our Java files and have only one GSS to rule them all. This way, variable files will remain modular, and yet we will still have only one file to require in each GSS file that need to access variables. If we need to change the structure, like adding a new subset of variables, we will only need to update one file, and that’s all!

I call this super GSS file theme.gss because it will be used to produce different themes, but you could name it variables.gss and it would still be totally accurate.

// src/main/resources/com/company/project/client/resources/css/theme.gss

@provide 'theme';

/**
 * Colors
 */

@def C_PRIMARY                  eval("com.company.project.client.resources.theme.Colors.C_PRIMARY");
@def C_PRIMARY_BACKGROUND       eval("com.company.project.client.resources.theme.Colors.C_BACKGROUND");
@def C_TEXT                     eval("com.company.project.client.resources.theme.Colors.C_TEXT");
/* ... */

/**
 * Fonts
 */

@def F_PRIMARY                  eval("com.company.project.client.resources.theme.Fonts.F_PRIMARY");
@def F_PRIMARY_BOLD             eval("com.company.project.client.resources.theme.Fonts.F_PRIMARY_BOLD");
/* ... */

/**
 * Sizes
 */

@def S_LINE_HEIGHT              eval("com.company.project.client.resources.theme.Sizes.S_LINE_HEIGHT");
@def S_SECTION_PADDING          eval("com.company.project.client.resources.theme.Sizes.S_SECTION_PADDING");
/* ... */

With this new method, things are now easier to maintain:

// src/main/java/com/company/project/client/resources/AppResources.java

package com.company.project.client.resources;

import com.google.gwt.resources.client.ClientBundle;
import com.google.gwt.resources.client.CssResource;

public interface AppResources extends ClientBundle {
    interface Style extends CssResource {
        // Your classes here
    }

    // We only need to source the theme file
    @Source({"css/theme.gss",
             "css/style.gss"})
    Style style();
}
/* src/main/resources/com/company/project/client/resources/css/style.gss */

/* And we only have one file to require */
@require "theme";

body {
    /* All variables are still accessibles */
    background-color: C_BACKGROUND;
    color: C_TEXT;
    font-family: F_PRIMARY;
    line-height: S_LINE_HEIGHT;
}

As the constants’ values are stocked in Java files, these constants can be modified easily. With this technique, it is now super easy to create different themes that can be user-based or changed at compile time.

Updated Structure

Using a theme file, my structure now looks like this:

src/main/java/com/company/project/client/resources/
    -> elements/
    -> pages/
    -> theme/
        -> Colors.java
        -> Fonts.java
        -> Sizes.java
    -> AppResources.java
    -> ResourcesLoader.java

src/main/resources/com/company/project/client/resources/css
    -> elements/
    -> pages/
    -> style.gss
    -> theme.gss

Tips

A variable will output the string of text inside of it into your CSS. Sometimes, you will need a variable to output more then one set of properties. You can do so this way:

// src/main/java/com/company/project/client/resources/theme/Fonts.java
public class Fonts {
    public static final String F_PRIMARY = "'My Cool Typo', sans-serif";
    public static final String F_PRIMARY_BOLD = "'My Cool Typo', sans-serif; font-weight: 700";
}

Can you spot the trick in F_PRIMARY_BOLD? The variable is defining the font-family, closed with the semicolon ;, then define the font-weight, without a closing semicolon ; because the closure will be handled in the CSS.

/* src/main/resources/com/company/project/client/resources/css/theme.gss */
body {
    font-family: F_PRIMARY;
    /* will output : */
    font-family: 'My Cool Typo', sans-serif;
}

h1 {
    font-family: F_PRIMARY_BOLD;
    /* will output : */
    font-family: 'My Cool Typo', sans-serif;
    font-weight: 700;
}

Conclusion

You now understand the true power of variables. When used with a theme file, the management of your application becomes a breeze. Things can be made even easier, using a tool to manage the generation of your theme and the associated files. But that, my friends, is a topic for another blog post.

Post_GSS_Howto_v2-03

Open letter to our community

Hello friend,

This letter is going out to everyone in our network, but especially to you in our open source development community. Many of you have been involved with us since the very beginning, when Philippe and I were working on GWTP as part of puzzlebazar. As we became Arcbees and continued to develop tools and best practices for ourselves, we have continued to share and develop them with you. We are proud of what this community has accomplished, and we are grateful for everything we have learned from you in the process.

We are enjoying our business adventure so far, and wish to do even more in the future. Our open source initiatives have always been our top priority, but we do face a challenge faced by many other open source startups. We need to move from a service business to a product business and we want to dedicate a team to work on our open source projects, to improve our tools faster, offer commercial clients the best support experience and continue our involvement with our community.

Post_Arcbees_Survey_v1-04 (1)

This is why I want to reach out to ask for your help! We’ve put together a brief survey asking critical questions that we hope will help us improve our support offering. I also welcome you to contact me directly if you want to share feedback without feeling constrained by the survey. I’d be very happy to speak with anybody who has ideas they want to share with me!

Please fill out the survey and/or contact me directly.

Thank you for your help!

Post_Arcbees_Survey_v1-03 (1)

Getting started with CSS (GSS) and GWT

Getting started with CSS (GSS) in GWT

GWT can be hard to tackle at first, especially if your experience is entirely in front-end web development. You may be an HTML and CSS ninja, but not much of a Java wizard. This tutorial introduces how style sheets are used in GWT. I will not explain how to create a new GWT project, and will assume that you have an application you can run. That will let us focus on style sheets in GWT.

Once completed, don’t forget to have a look at the second part : Managing your CSS (GSS) files with variables and a theme.

From the beginning

If there is no style sheet inside of your application, or if you want a rough understanding of how it works, here’s a small step-by-step guide to add your default CSS file. Note that your application might be using a different folder structure than my example program, and that you will have to replace com/company/project to match your project.

The CSS file

Post_GSS_Howto_v2-01

We will create our initial CSS file into src/main/resources/com/company/project/client/resources/css and will name it style.gss. That’s right, .gss and not .css, as GSS files are like CSS files, but with more power. And we always want more power, don’t we?

We should add at least one line in our file, so we know that it’s working. Let’s use :

body { background-color: pink; }

At this point, it should not be working yet.

The Resource file

Post_GSS_Howto_v2-04

We then need to create the resource file that will be the bridge between your GSS file and your Java classes. This is because GWT will obfuscate class names on compliation, so this file will handle the links between the obfuscated names and classes inside of your GSS file.

Let’s create AppResources.java inside of src/main/java/com/company/project/client/resources

The code inside of it goes like this:

package com.company.project.client.resources;

import com.google.gwt.resources.client.ClientBundle;
import com.google.gwt.resources.client.CssResource;

public interface AppResources extends ClientBundle {
    interface Style extends CssResource {
    }

    @Source("css/style.gss")
    Style style();
}

The Resource Loader file

Post_GSS_Howto_v2-06

We now need to setup the loader file to, well, to load everything inside the application.

Once again inside src/main/java/com/company/project/client/resources, create a file named ResourceLoader.java, containing :

package com.company.project.client.resources;

import javax.inject.Inject;

public class ResourceLoader {
    @Inject
    ResourceLoader(
            AppResources appResources) {
        appResources.style().ensureInjected();
    }
}

The ensureInjected() is the important part here, as it will inject your CSS into the DOM.

Don’t forget to bind this file inside your ClientModule, probably located at src/main/java/com/company/project/client/gin/ClientModule.java

package com.company.project.client.gin;

// [your imports]

public class ClientModule extends AbstractPresenterModule {
    @Override
    protected void configure() {
        // [your code]
        bind(ResourceLoader.class).asEagerSingleton();
    }

    // [you might have code here too]
}

Activate GSS

Post_GSS_Howto_v2-07

GSS has been included in GWT since version 2.7, but is not enabled by default. To enable it, you need to add one line of code inside your GWT module. Mine is located at src/main/java/com/company/project/AppModule.gwt.xml and looks like this:

<?xml version="1.0" encoding="UTF-8"?>
<!DOCTYPE module PUBLIC "-//Google Inc.//DTD Google Web Toolkit 2.7.0//EN"
        "http://gwtproject.org/doctype/2.7.0/gwt-module.dtd">
<module rename-to="AppModule">
   // [Inheriting some stuff]
   // [Source some stuff]

   // The line that you need to add
   <set-configuration-property name="CssResource.enableGss" value="true">

   // [Some more code extending ... thing?]
</module>

Voilà! If things went well, your application should build and run, loading your style.gss file in the process. Don’t worry if it fails, as you might have your application structured in a different way than shown in this tutorial. If you take time to read compile errors, you should manage to make it right. If you don’t, but have a backend dev near you, it’s always good to ask for help.

Using classes

One of the most confusing thing at first while working on GSS files in GWT is that you will need to declare your classes inside of your resource file to be able to access them.

Let’s add some classes into our style.gss file :

body {
    background-color: pink;
    padding: 2em 0;
}

.my_first_class {
    color: red;
}

.my_second_class {
    color: blue;
}

We then need to adapt the resource file accordingly:

package com.company.project.client.resources;

import com.google.gwt.resources.client.ClientBundle;
import com.google.gwt.resources.client.CssResource;

public interface AppResources extends ClientBundle {
    interface Style extends CssResource {
        String my_first_class();

        String my_second_class();
    }

    @Source("css/style.gss")
    Style style();
}

Congratulations! You can now use you classes inside your views (you know, the files ending with .ui.xml) and even with your Java files.

We will first need a view. The file that we will be working on, aka ApplicationView.ui.xml, looks like this:

<ui:UiBinder xmlns:ui='urn:ui:com.google.gwt.uibinder'>
    <div>
        <h1>Hello World!</h1>

        <p>This is my first paragraph.</p>
        <p>This is my second paragraph.</p>
    </div>
</ui:UiBinder>

In order to use our classes, we will need to import the desired resource into the view :

<ui:with field="resources" type="com.company.project.client.resources.AppResources"/>

We can now call the required classes using resources.style.name_of_my_class

In the precedent view, the final code would be :

<ui:UiBinder xmlns:ui='urn:ui:com.google.gwt.uibinder'>

    <ui:with field="resources" type="com.company.project.client.resources.AppResources"/>

    <div>
        <h1>Hello World!</h1>

        <p class="{resources.style.my_first_class}">This is my first paragraph.</p>
        <p class="{resources.style.my_second_class}">This is my second paragraph.</p>
    </div>
</ui:UiBinder>

You should know that Java uses the CamelCase naming convention, and that hyphenated class names using “-" will not compile. In order to make it work, you will need to use @ClassName inside of your CssResource:

@ClassName("my-class-name")
String myClassName();

Structure

Post_GSS_Howto_v2-09

It’s good to split your CSS into multiple files. It will be easier to maintain and understand, and will help you think in blocks and structure your classes accordingly; rather than having only one CSS file that does everything, but where you are not sure what that everything is.

A structure that I like, (but feel free to adapt it), is this one:

/resources
    /css
        /elements               // -> Elements that you reuse here and there
            section.gss
            form.gss
            anyElement.gss
        /pages                  // -> Pages related style
            login.gss
            contact.gss
        style.gss               // -> Your main style

Working with multiple GSS files

Post_GSS_Howto_v2-08

While working with multiple GSS files, you have two options: you can create a resource file for that GSS and include it only in views that will need it, or you can declare multiple GSS files into the same resource.

One resource file per GSS

It might sound easier to stack everything into the same resource file, but as with CSS files, it’s always better to break your code in blocks. If you have a contact.gss file that will only be used inside of your contact.ui.xml, you should create a dedicated resource for that. And I’d guess that you would also need your default style inside that view.

// src/main/resources/com/company/project/client/resources/css/pages/contact.gss

.contact {
    background-color: orange;
    padding: 4em;
}

.contact_form {
    width: 100%;
    border: 1px solid #00f;
}
// src/main/java/com/company/project/client/resources/pages/ContactResources.java

package com.company.project.client.resources.pages;

import com.google.gwt.resources.client.ClientBundle;
import com.google.gwt.resources.client.CssResource;

public interface AppResources extends ClientBundle {
    interface Style extends CssResource {
        String contact();

        String contact_form();
    }

    @Source("com/company/project/client/resources/css/pages/contact.gss")
    Style style();
}
// src/main/java/com/company/project/client/application/contact/ContactView.ui.xml

<ui:UiBinder xmlns:ui='urn:ui:com.google.gwt.uibinder'>

    <ui:with field="resources" type="com.company.project.client.resources.AppResources"/>
    <ui:with field="pageResources" type="com.company.project.client.resources.pages.ContactResources"/>

    <div class="{pageResources.style.contact}">
        <h1>My contact page!</h1>

        <p class="{resources.style.class_from_style_gss}">
            This is a beautiful contact form.
        </p>

        <form class="{pageResources.style.contact_form}">
            <input type="email" placeholder="your email please" />
            <input type="submit" value="Go!" />
        </form>
    </div>
</ui:UiBinder>

Multiple GSS files in the same resource

Let’s say you have a small application with only 3 pages: homepage, services and contact. For each page, you created a corresponding GSS file (homepage.gss, services.gss and contact.gss).

You could create one resource file for each, like in the previous example. You could also create one resource file to rule them all, named PageResources.java.

// src/main/java/com/company/project/client/resources/PageResources.java

package com.company.project.client.resources;

import com.google.gwt.resources.client.ClientBundle;
import com.google.gwt.resources.client.CssResource;

public interface AppResources extends ClientBundle {
    interface Homepage extends CssResource {
        String homepage();

        String homepage_big_title();

        [other cool classes related to homepage only]
    }

    interface Services extends CssResource {
        String services();

        [other cool classes related to services only]
    }

    interface Contact extends CssResource {
        String contact();

        String contact_form();

        [other cool classes related to contact only]
    }

    @Source("com/company/project/client/resources/css/pages/homepage.gss")
    Homepage homepage();

    @Source("com/company/project/client/resources/css/pages/services.gss")
    Services services();

    @Source("com/company/project/client/resources/css/pages/contact.gss")
    Contact contact();
}

You will need to update your ResourceLoader.java accordingly:

package com.company.project.client.resources;

import javax.inject.Inject;

public class ResourceLoader {
    @Inject
    ResourceLoader(
            AppResources appResources) {
        appResources.homepage().ensureInjected();
        appResources.services().ensureInjected();
        appResources.contact().ensureInjected();
    }
}

Now, you can include the PageResources in each of your pages. It will give you access to every interfaces in it (homepage, services, contact).

// src/main/java/com/company/project/client/application/contact/ContactView.ui.xml

<ui:UiBinder xmlns:ui='urn:ui:com.google.gwt.uibinder'>

    <ui:with field="resources" type="com.company.project.client.resources.AppResources"/>
    <ui:with field="pageResources" type="com.company.project.client.resources.PageResources"/>

    <div class="{pageResources.contact.contact}">
        <h1>My contact page!</h1>

        <p class="{resources.style.class_from_style_gss}">
            This is a beautiful contact form.
        </p>

        <p class="{pageResources.homepage.homepage_big_title}">
            Hey look, I can also use a class from the homepage, even though I should probably don't do this, right?
        </p>

        <form class="{pageResources.contact.contact_form}">
            <input type="email" placeholder="your email please" />
            <input type="submit" value="Go!" />
        </form>
    </div>
</ui:UiBinder>

Using images

Post_GSS_Howto_v2-05

If you want to use images inside of your GSS file, you will need to declare them as an ImageResource. Your image will need to be inside your resources folder, and like your GSS files, it’s always a good thing to create a proper folder structure in order to maintain control.

// src/main/java/com/company/project/client/resources/pages/ContactResources.java

package com.company.project.client.resources.pages;

import com.google.gwt.resources.client.ClientBundle;
import com.google.gwt.resources.client.CssResource;
import com.google.gwt.resources.client.ImageResource;
// ^ don't forget to import the ImageResource package

public interface AppResources extends ClientBundle {
    interface Style extends CssResource {
        String contact();

        String contact_form();
    }

    @Source("images/contact/background.jpg")
    ImageResource background();

    @Source("com/company/project/client/resources/css/pages/contact.gss")
    Style style();
}
// src/main/resources/com/company/project/client/resources/css/pages/contact.gss

@def BACKGROUND resourceUrl("background");

.contact {
    background: BACKGROUND no-repeat center center;
    padding: 4em;
}

.contact_form {
    width: 100%;
    border: 1px solid #00f;
}

Conclusion

CSS with GWT is not an easy task at first, but after mastering the basics, you can regain your status as a front end ninja in GWT-land. Find the workflow that suits your need, structure your files and don’t forget to have fun!

In my next post, I will teach you how to leverage the real power behind GSS and simplify your life, using variables and a theme file. Stay tuned!

Post_GSS_Howto_v2-03

Gwt-Platform event best practices (revisited)

Not too long ago, I started using GWT and GWTP and found it pretty hard to understand its event system.

I still can’t find much recent information about it, so I am writing this post to hopefully help others. Disclaimer: There many ways to achieve what I do in this post, but this is the way I prefer.

All right! Let’s demonstrate how events and the event bus work by creating a CSI-Hacking Dashboard. You can get the code on GitHub.

Post_gwtp_Howto_v1-03

We have ComputerPresenter, a HackerPresenter and a root Presenter that holds/creates other widgets. We also have a ComputerHackedEvent and ComputerHackedHandler. The event will be raised to signal that the computers got hacked, and the handler code will be executed after that.

Here’s the classic implementation of a GWT event. Our event will only carry the hacker’s name.

public class ComputerHackedEvent extends GwtEvent<ComputerHackedEvent.ComputerHackedHandler> {
    public interface ComputerHackedHandler extends EventHandler {
        void onSystemHacked(ComputerHackedEvent event);
    }

    public static final Type<ComputerHackedHandler> TYPE = new Type<>();

    private final String hackerName;

    public ComputerHackedEvent(String hackerName) {
        this.hackerName = hackerName;
    }

    public static void fire(String hackerName, HasHandlers source) {
        source.fireEvent(new ComputerHackedEvent(hackerName));
    }

    public String getHackerName() {
        return hackerName;
    }

    @Override
    public Type<ComputerHackedHandler> getAssociatedType() {
        return TYPE;
    }

    @Override
    protected void dispatch(ComputerHackedHandler handler) {
        handler.onSystemHacked(this);
    }
}

I usually declare my handler as a nested interface in the event declaration. That’s only a matter of personal preference though.

Next we have to raise the event. That will be done by our HackerPresenter. A really simple way of becoming a computer hacker, is by adding a button to the screen and pressing it, right CSI?

Here’s the code of the view and the presenter.

public class HackerView extends ViewWithUiHandlers<HackerUiHandlers>
        implements HackerPresenter.MyView {
    interface Binder extends UiBinder<Widget, HackerView> {
    }

    @UiField
    Button hackThePlanet;

    @Inject
    HackerView(Binder binder) {
        initWidget(binder.createAndBindUi(this));
    }

    @UiHandler("hackThePlanet")
    public void initiateHacking(ClickEvent event) {
        getUiHandlers().onInitiateHacking();
    }
}
public class HackerPresenter extends PresenterWidget<MyView>
        implements HackerUiHandlers {
    public interface MyView extends View, HasUiHandlers<HackerUiHandlers> {
    }

    private final String hackerName;

    @Inject
    HackerPresenter(
            EventBus eventBus,
            MyView view,
            @Assisted String hackerName) {
        super(eventBus, view);

        this.hackerName = hackerName;

        getView().setUiHandlers(this);
    }

    @Override
    public void onInitiateHacking() {
        ComputerHackedEvent.fire(hackerName, this);
    }
}

So we have a button, and when we click on it, it raises an event. There are a couple of ways to raise an event, but the one I usually use, is the static fire() method on the event. (I’ll talk about the other ways of firing an event later on.)

Now we have to handle the event somewhere. We want to know when the computers get hacked, so we’ll represent the computers with the ComputerPresenter. Its role will be to print in the console when it gets hacked, and by which hacker. Here’s the presenter code:

public class ComputerPresenter extends PresenterWidget<MyView>
        implements ComputerHackedEvent.ComputerHackedHandler {
    public interface MyView extends View {
        void setComputerName(String computerName);

        void displayStatus(String computerName, String hackerName);
    }

    private final String computerName;

    @Inject
    ComputerPresenter(
            EventBus eventBus,
            MyView view,
            @Assisted String computerName) {
        super(eventBus, view);

        this.computerName = computerName;

        view.setComputerName(computerName);
    }

    @Override
    protected void onBind() {
        super.onBind();

        addRegisteredHandler(ComputerHackedEvent.TYPE, this);
    }

    @Override
    public void onSystemHacked(ComputerHackedEvent event) {
        getView().displayStatus(computerName, event.getHackerName());
    }
}

This way, when a hacker clicks on the “start hacking” button, all the computers that are listening to the event will print something. As you can see, the ComputerPresenter registers itself as a handler for the ComputerHackedEvent through the addRegisteredHandler method.

This is a convenience method provided by GWTP. Using this method instead of registering directly on the EventBus will make the event registration part of GWTP’s lifecycle and unbind the event handler when the presenter is unbound. That means that if the presenter is unbound and rebound, you’ll have to re-register event handlers. This is why the onBind method is a good place to register handlers.

Here’s the code of the root presenter:

public class RootPresenter extends Presenter<RootPresenter.MyView, RootPresenter.MyProxy> {
    interface MyView extends View {
    }

    @ProxyStandard
    @NameToken(NameTokens.home)
    interface MyProxy extends ProxyPlace<RootPresenter> {
    }

    public static final Object SLOT_COMPUTERS = new Object();
    public static final Object SLOT_HACKERS = new Object();

    private final WidgetsFactory widgetsFactory;

    @Inject
    RootPresenter(
            EventBus eventBus,
            MyView view,
            MyProxy proxy,
            WidgetsFactory widgetsFactory) {
        super(eventBus, view, proxy, ApplicationPresenter.SLOT_SetMainContent);

        this.widgetsFactory = widgetsFactory;
    }

    @Override
    protected void onBind() {
        super.onBind();

        HackerPresenter zeroCool = widgetsFactory.createHacker("Zer0C00L");
        HackerPresenter acidBurn = widgetsFactory.createHacker("AcidBurn");

        addToSlot(SLOT_HACKERS, zeroCool);
        addToSlot(SLOT_HACKERS, acidBurn);

        ComputerPresenter computerA = widgetsFactory.createComputer("A");
        ComputerPresenter computerB = widgetsFactory.createComputer("B");

        addToSlot(SLOT_COMPUTERS, computerA);
        addToSlot(SLOT_COMPUTERS, computerB);
    }
}

We just create one hacker named Zer0C00L and 2 computers to hack. And now the view:

public class RootView extends ViewImpl
        implements RootPresenter.MyView {
    interface Binder extends UiBinder<Widget, RootView> {
    }

    @UiField
    HTMLPanel computers;
    @UiField
    HTMLPanel hackers;

    @Inject
    RootView(Binder uiBinder) {
        initWidget(uiBinder.createAndBindUi(this));
    }

    @Override
    public void addToSlot(Object slot, IsWidget content) {
        super.addToSlot(slot, content);

        if (slot == RootPresenter.SLOT_COMPUTERS) {
            computers.add(content);
        } else if (slot == RootPresenter.SLOT_HACKERS) {
            hackers.add(content);
        }
    }

    @Override
    public void removeFromSlot(Object slot, IsWidget content) {
        super.removeFromSlot(slot, content);

        if (slot == RootPresenter.SLOT_COMPUTERS) {
            computers.remove(content);
        } else if (slot == RootPresenter.SLOT_HACKERS) {
            hackers.remove(content);
        }
    }
}

Post_gwtp_Howto_v1-04

Nice! When I click on “Hack the planet!” I see the following result in the Javascript console:

I got hacked. (A) by Zer0C00L
I got hacked. (B) by Zer0C00L

I should start writing in l33tsp33k now.

Now what if you remove one of the ComputerWidgets from the DOM by calling removeFromSlot(SLOT_COMPUTERS, computerB); and still try to hack the planet?

If you read the output of the console you will see:

I got hacked. (A) by Zer0C00L
I got hacked. (B) by Zer0C00L

Wait… What? The handler for the computer B is still registered, the presenter wasn’t unbound, it was only removed from the DOM.

What if we want computer B to stop listening to the events when it’s not present in the DOM? Well that’s a job for addVisibleHandler. So instead of registering the handler using addRegisteredHandler we’ll use addVisibleHandler that will handle this for us. This way, when a presenter is considered “not visible” in GWTP’s lifecycle perspective (read: not visible as in “visible in the DOM”), the event will not reach the handler. The new output should now be:

I got hacked. (A) by Zer0C00L

There’s still a problem though. What if there were too many computers for a single hacker? I think at some point we’ll have to add someone to the team. Let’s do it!

// in the RootPresenter's OnBind method
HackerPresenter acidBurn = widgetsFactory.createHacker("AcidBurn");
addToSlot(SLOT_HACKERS, acidBurn);

You should see 2 buttons saying “Hack the planet!” and when you click them both, the output is:

I got hacked. (A) by Zer0C00L
I got hacked. (B) by Zer0C00L
I got hacked. (A) by AcidBurn
I got hacked. (B) by AcidBurn

All computers are reacting to every hacker, which is not what we want. This is happening because of the way we registered the handlers earlier. What we want is for the computers to react a specific hacker’s ComputerHackedEvent.

Since we can have a reference to the said hacker, that is pretty easy to accomplish. We have to delegate the handler registration to the concerned presenter. From the RootPresenter we’ll delegate the task, but first let’s create an interface :

import com.google.web.bindery.event.shared.HandlerRegistration;

public interface HasComputerHackedHandlers {
    HandlerRegistration addComputerHackedHandler(ComputerHackedEvent.ComputerHackedHandler handler, Object source);
}

We can then let ComputerPresenter implement it.

public HandlerRegistration addComputerHackedHandler(ComputerHackedEvent.ComputerHackedHandler handler, Object source) {
    HandlerRegistration hr = getEventBus().addHandlerToSource(ComputerHackedEvent.TYPE, source, handler);
    registerHandler(hr);
    return hr;
}

Note that instead of registerHandler() you can also use registerVisibleHandler().

And finally, when you click on both buttons, the output should be:

I got hacked. (A) by Zer0C00L
I got hacked. (B) by AcidBurn

All right! We’re ready to hack the planet! Are we?

Post_gwtp_Howto_v1-02

Remember when I said I would talk about the ways of firing events? If you are new to GWT and GWTP, you might have noticed that there are multiple methods available to fire events and register handlers.

// GWT
eventBus.addHandler(eventType, handler)
eventBus.addHandlerToSource(eventType, source, handler)

eventBus.fireEvent(event)
eventBus.fireEventFromSource(event, source)

// GWTP
presenterWidget.addHandler(eventType, handler) // deprecated
presenterWidget.addRegisteredHandler(eventType, handler)
presenterWidget.addVisibleHandler(eventType, handler)
presenterWidget.registerHandler(handlerRegistration)
presenterWidget.registerVisibleHandler(handlerRegistration)

presenterWidget.fireEvent(event)

Confused yet? I can say I was after seeing this. If you dig down you can see that a presenter widget gets an event bus injected and delegates most of its job to it. The only difference is that GWTP manages the handler registrations with its lifecycle (i.e: when a presenter gets unbound, the registered handlers get cleared). Also, if you dig for the fireEvent method, you’ll see GWTP delegates to eventBus.fireEventFromSource(). You may want to call the original fireEvent() if you want to match the following case (taken from the javadoc) “Fires the event from no source. Only unfiltered handlers will receive it”. Honestly, I’ve never faced that situation.

Here’s my cheat sheet of events in GWTP:

– Do I need to fire an event globally on the event bus? (i.e: everything registered to the event will handle it)
Y: presenterWidget.addRegisteredHandler() + SomeEvent.fire()
N: Go next

– Do I need to filter the handlers by the visibility of the handler?
Y: presenterWidget.addVisibleHandler() + SomeEvent.fire()
N: Go next

– Do I need specific handlers to handle events from a specific source?
Y: Create an interface called HasXXXHandlers and make your handling presenter implement it. GWTP gives PresenterWidget the capability to register handlers via registerHandler() and registerVisibleHandler(). Finally, fire the event with SomeEvent.fire()
N: That’s it. I usually don’t need more options, so the decision tree ends here. If you have another situation that doesn’t fit, let me know!

Post_gwtp_Howto_v1-05

GAE-Studio is now open source!

Some of you may already have noticed or heard me saying that GAE-Studio was going to be open sourced and I think it is past overdue to officially announce it: GAE-Studio is now open source under Apache 2 and freely available! We promise to keep working on it, and to make that possible, we’re going to add GAE-Studio support to our open source support packages. You can find the source code under our Arcbees github organization as well as on maven central. We released an official, stable version 1.0 a couple of days ago that you can see in action on our demo website. You can also read our documentation to learn more about how to install GAE-Studio in your Google App Engine application.

gae_datastore_viewer

Some may wonder why we chose to open source what was going to be our first official product. We’ve first started this venture almost 3 years ago when Arcbees was still in its inception. We were using Google App Engine heavily, and the lack of a good datastore admin console was a big problem. At the time, Google App Engine didn’t have any hooks on which we could build one, so we hacked our way around and built something useful for our own work. One year later, after finding other users were feeling the same pain as we did using Google App Engine, we set out to improve GAE-Studio user experience. It was planned to be our very first product that wasn’t going to be open sourced.

Last summer, Google IO announced a new console for Google App Engine that removed much of the pain that GAE-Studio was designed to help with. Then some time later, Objectify-Insight came out, and our visualization engine would be in competition with it. Since we love and have been using Objectify for years, we didn’t want to become their commercial competitor.

Post_gaestudio_v2

Still, we were and are hopeful that GAE-Studio will be useful for our developers. For one thing, GAE-Studio is available to all environments using the Modules, although it was initially written for the Java runtime. This is because Google now provides hooks in the Google App Engine SDK for the things we had to hack our way around to in the past. The further advantage of GAE-Studio is that it can be used locally! While Google has improved the usability of their cloud console a lot, the usability of local development tools is still weak.
Several hundred users have expressed an interest in using GAE-Studio, and we are now ready to officially release it in their hands. We hope you will find GAE-Studio useful, and will help us support the remaining runtime.

Thanks for the support and words of encouragement, and thanks for sticking with us through this venture!

About GAE-Studio

GAE Studio helps you optimize applications hosted on Google App Engine.

GAE Studio also allows datastore exploration, modification, deletion, import and export. Think of it as your swiss army knife for developing GAE applications!

Using real-time analysis of datastore requests, GAE Studio quickly highlights inefficient queries and gathers metrics that will help developers improve application performance.

GWT.create 2015: Top 5 sessions

Following my last week post about my experience at GWT.create 2015, I would have chosen more than 5 sessions to talk about, but I had to cut this short if I wanted to keep my readers 😀 Here’s my top 5:

  1. New brand and documentation
  2. Singular
  3. JsInterop
  4. GSS
  5. Incremental compile in SDM

New Brand and new website

I didn’t list this one first simply because Arcbees’ own Manon Gruaz did the design, but more because the GWT brand looked a lot like an old guy in a disco – possibly cool inside but not really looking that cool to onlookers. The centrality of Java alone feels dated for some people. The logo was definitely dated and a due for a makeover, and the documentation was starting to look like a 1990’s style early website. A full reboot of the brand was needed, something fresh that would communicate how much we care about architecture, how we work together as a community and the simplicity we seek while nevertheless building large, maintainable enterprise web applications.

GWT2015_7

While there’s still work to do on the documentation itself, the new branding was designed to be extensible, and is ready to be used seamlessly across the GWT community. I invite you to take a look at the GWT Brand book to learn more about the GWT brand and logo.

GWT2015_11

Singular

This session by Daniel Kurka was one of my favorites at GWT.Create for several reasons. While simplifying the development process considerably using the same patterns as Angular, something even more powerful lurks behind the scenes. It lets you build true multiplatform applications (Android, iOS, web). Singular uses techniques developed for Inbox that let you compile java code to Objective-C thanks to J2ObjC and to javascript thanks to GWT. So that more than 80% of you code can be shared between the three platforms. To know more, I invite you to watch j2objc’s session by Tom Ball: J2ObjC: Sharing Java Code with iOS Applications.

Angular has performance problems when it comes to really large web applications. As you know, Angular scans the DOM for directives at runtime. Singular, thanks to GWT, does that at compile time, improving performance by a lot.

The project is still in its infancy, but what Daniel did already demonstrates that writing Java can be as simple as writing Javascript while preserving Type Safety. To know more, I invite you to watch Daniel Kurka’s session: Singular – Reimagining AngularJS in Java.

JsInterop

Writing wrappers has always been a pain in the ass and while using an external javascript library is possible, it is truly tedious; to the point where I have seen some business dropping GWT because they couldn’t easily use some of their favorite Javascript libraries. This won’t be a problem anymore. You can already turn on JsInterop in GWT 2.7 as an early release, but you’ll really get everything you need to start hacking around a Javascript library in GWT 2.8. In case you have any doubts, I invite you to take a look at Ray Cromwell’s session: Deep dive in JsInterop.

GSS

If you have a web development background and have done a bit of CSS, you know how painful it can be to work with CssResources; not because it was poorly designed, but mostly because some fundamental CSS3 features weren’t even available! To keep up the with the pace of this ever-changing world, GSS has been added to GWT. GSS brings full CSS3 support and several interesting features like mixins, conditionals, variables and more. It’s now easier to write and maintain the CSS files of your GWT application.

Thanks to Julien Dramaix, this is one of the few major outside contributions made to GWT since the steering committee was created, and we’re proud to have participated in this. To learn more about GSS, I invite you to take a look at Julien Dramaix’s session: CSS3 and GWT in perfect harmony.

Incremental compile in SDM

Last,but not least, incremental compilation now lets us seamlessly refresh our work in the browser in day to day development activities, and get the latest code from our IDE in less than 2 seconds. Before, it was a real pain to use SDM because it would do a full recompile of the whole application each time you needed to see a new change. Thanks to incremental compilation, that is not the case anymore.

IDE support in both Eclipse and IntelliJ is still in active development. We can already use our favorite debugger, but in some cases, it will not work. For now, we’re still stuck debugging in my Chrome console, and thanks to source map, we can see quickly where problems are. I’m still eager to go back to my IDE, put my breakpoints in and get my usual workflows in place, and I’m pretty sure that I will see that happen really soon! To learn more, I invite you to take a look at John Stalcup’s session: Incremental compilation.

Conclusion

In conclusion, GWT.Create was a blast this year! I had fun, met great developers, great businesses and I got to see all my remote friends that I only see once or twice a year. I know I speak for the rest of my team as well in saying that, and I’ll be eager to participate in GWT.Create next year. I’m already pledging that we will submit more sessions for the pleasure of the GWT community and our own open source community!

See ya next year!